
reCAPTCHA v2 and reCAPTCHA v3 are both free bot protection services developed by Google. Both versions are effective at preventing bots from accessing websites and applications, but they have different strengths and weaknesses.
reCAPTCHA v2 requires users to complete a challenge to prove they are human. This challenge can be a simple checkbox that asks the user to confirm that they are not a robot, or a more complex challenge, such as selecting the correct images from a grid. reCAPTCHA v2 is very effective at blocking bots, but it can also be frustrating for users, especially if they have to complete a challenge multiple times.
reCAPTCHA v3 is a newer version of the service that runs in the background and analyzes user behaviour to assess their risk score. This risk score is based on a variety of factors, such as how the user interacts with the website or application and whether they are coming from a known botnet IP address. reCAPTCHA v3 is less disruptive to the user experience than reCAPTCHA v2.
In one line: reCAPTCHA v2 requires user interaction, while reCAPTCHA v3 does not.
This tutorial teaches you how to use reCAPTCHA v2 and reCAPTCHA v3 with jQuery.
Table of Contents
Validate Google reCAPTCHA v2 Using Javascript/jQuery
Step 1: Register Your Site
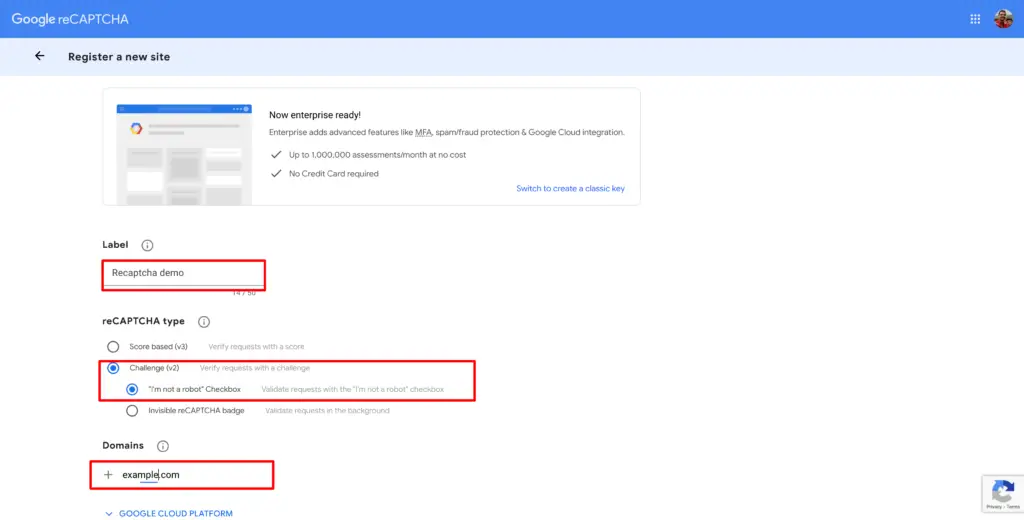
Before integrating reCAPTCHA v2, you need to register your website on the reCAPTCHA admin console (https://www.google.com/recaptcha/admin/create) to obtain the necessary site key and secret key.
Enter Label, Select reCaptcha type as Challenge (v2), and add the desired domain name where you want to incorporate reCAPTCHA.
Step 2: Include jQuery and reCAPTCHA Script
Include jQuery and the reCAPTCHA API script in your HTML file:
<script src="https://code.jquery.com/jquery-3.6.0.min.js"></script>

<script src="https://www.google.com/recaptcha/api.js" async defer></script>
Step 3: Add reCAPTCHA Widget
In your HTML form, include the reCAPTCHA widget using the g-recaptcha div:
<div class="g-recaptcha" data-sitekey="YOUR_SITE_KEY"></div>Replace YOUR_SITE_KEY with the actual reCAPTCHA v2 site key you obtained in Step 1.
Step 4: Create a Validation Function
Now, create a validation function that checks whether the reCAPTCHA challenge has been completed successfully:
function validateRecaptcha() {
    var response = grecaptcha.getResponse();

    if (response.length === 0) {
        // reCAPTCHA not verified
        alert("Please complete the reCAPTCHA challenge.");
        return false; // Prevent form submission
    } else {
        // reCAPTCHA verified
        return true; // Proceed with form submission
    }
}
Step 5: Hook the Validation Function to Your Form
Attach the validateRecaptcha() function to your form’s submit event:
$(document).ready(function() {
    $('#your-form-id').submit(function(event) {
        if (!validateRecaptcha()) {
            event.preventDefault(); // Prevent form submission
        }
    });
});
Replace #your-form-id with the actual ID of your form.
With these steps, you can effectively integrate and validate both reCAPTCHA v2 and reCAPTCHA v3 using jQuery on your website forms.
Validate Google reCAPTCHA v3 Using Javascript/jQuery
Step 1: Register Your Site
Register your website on the reCAPTCHA admin console (https://www.google.com/recaptcha/admin/create) to obtain the reCAPTCHA v3 site key and secret key.
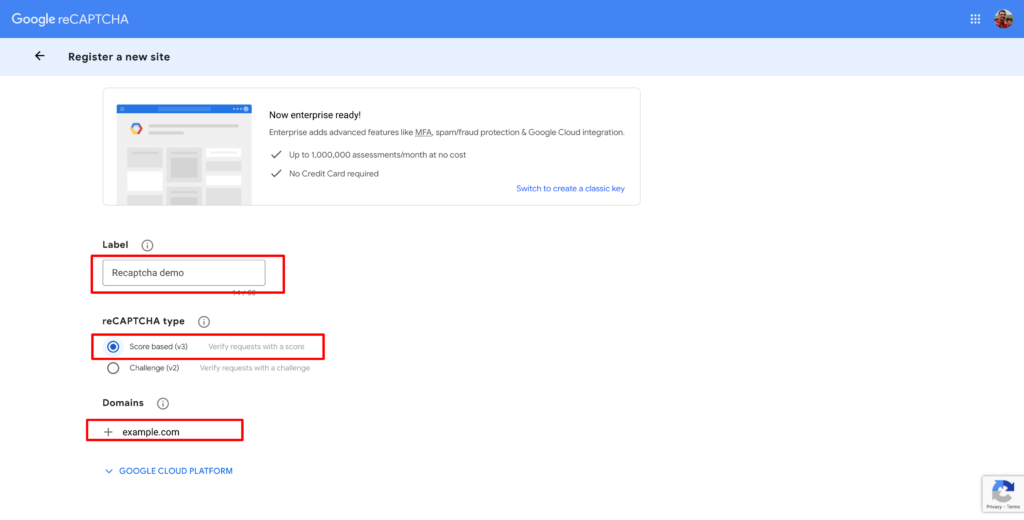
Before integrating reCAPTCHA v3, you need to register your website on the reCAPTCHA admin console (https://www.google.com/recaptcha/admin/create) to obtain the necessary site key and secret key.
Enter Label, Select reCaptcha type as Challenge (v3), and add the desired domain name where you want to incorporate reCAPTCHA.
Step 2: Include reCAPTCHA Script
Include the reCAPTCHA v3 API script in your HTML file. You don’t need jQuery for reCAPTCHA v3:
<script src="https://www.google.com/recaptcha/api.js?render=YOUR_SITE_KEY"></script>
Step 3: Generate a reCAPTCHA Token
In your form’s JavaScript, generate a reCAPTCHA token before form submission:
$(document).ready(function() {
    $('#your-form-id').submit(function(event) {
        grecaptcha.ready(function() {
            grecaptcha.execute('YOUR_SITE_KEY', {action: 'submit'}).then(function(token) {
                $('#recaptcha-token').val(token); // Store the token in a hidden input field
                // Continue with form submission
            });
        });
    });
});
Make sure to add a hidden input field in your form with the id recaptcha-token to store the reCAPTCHA token:
<input type="hidden" id="recaptcha-token" name="recaptcha-token">Step 4: Verify the Token on the Server
On your server-side script, verify the reCAPTCHA token by making a POST request to Google’s reCAPTCHA verification endpoint using your secret key. If the response indicates success, proceed with the form processing.
Here’s the JavaScript code for verifying the reCAPTCHA token on the server-side by making a POST request to the verification endpoint using your secret key. You can use Node.js and the axios library for this purpose:
const axios = require('axios');

// Your secret key obtained from reCAPTCHA admin console
const secretKey = "YOUR_SECRET_KEY";

// Verify reCAPTCHA token
app.post('/verify-recaptcha', async (req, res) => {
    const recaptchaToken = req.body['recaptcha-token'];

    if (!recaptchaToken) {
        // The reCAPTCHA token was not provided in the request
        // Handle this case accordingly, e.g., return an error message
        res.status(400).json({ error: 'reCAPTCHA token is missing' });
        return;
    }

    try {
        const response = await axios.post('https://www.google.com/recaptcha/api/siteverify', null, {
            params: {
                secret: secretKey,
                response: recaptchaToken,
                remoteip: req.connection.remoteAddress
            }
        });

        const { success } = response.data;

        if (success) {
            // reCAPTCHA verification passed
            // Continue with your form processing logic
            res.json({ success: true });
        } else {
            // reCAPTCHA verification failed
            // Handle the error accordingly, e.g., return an error message
            res.status(400).json({ error: 'reCAPTCHA verification failed' });
        }
    } catch (error) {
        // Handle any request or network errors
        res.status(500).json({ error: 'An error occurred while verifying reCAPTCHA' });
    }
});
This is how you can use the reCAPTCHA service to validate forms on your website.
Conclusion
By following the steps outlined in this article, you can effectively integrate and validate reCAPTCHA v2 and v3 using JavaScript/jQuery on your website forms. reCAPTCHA is a powerful tool that can help you protect your website from spam and abuse, while also providing a seamless user experience.
When choosing between reCAPTCHA v2 and v3, it is important to consider your specific needs. reCAPTCHA v2 is more effective at blocking bots, but it can also be more frustrating for users. reCAPTCHA v3 is less disruptive to the user experience, but it is not as effective at blocking bots.
If you are concerned about bot traffic and are willing to sacrifice some user experience, then reCAPTCHA v2 is a good option. If you want to minimize friction for your users and are willing to accept a slightly higher risk of bot traffic, then reCAPTCHA v3 is a better choice.
No matter which version of reCAPTCHA you choose, following the steps in this article, will help you implement it correctly and securely.
